Thursday, March 14, 2019

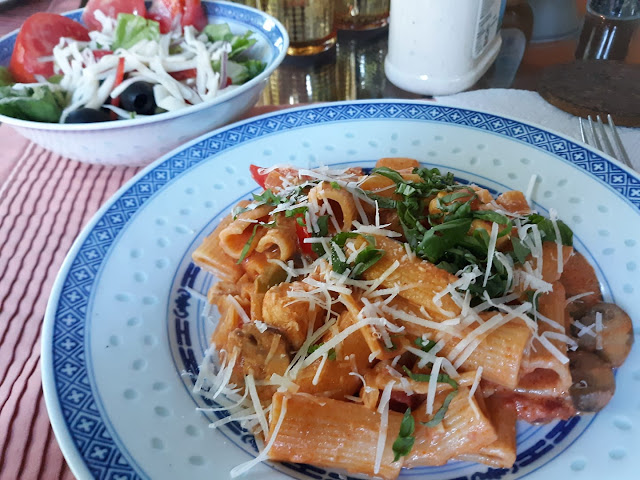
Adam's Chicken Riggies

Adam's Chicken Riggies

I really enjoy finding and preparing U.S. regional dishes--Key Lime Pie from Florida, Shrimp and Grits from Charleston, City Chicken from Polish neighborhoods in the midwest, Cheesesteak Sandwiches from Philadelphia, etc.

I found this particular recipe on the Internet and it intrigued me as it appears to be a regional dish specifically associated with the Utica/Rome area of New York State. It is a spicy pasta with chicken and red and green peppers in a creamy tomato sauce dish.

I found most of the recipes for this dish to be much too spicy for me (and there are endless variations on the Net) so I played around with the recipe until I made one that suited my palate.  My contribution was using premade arrabiata sauce. You can easily make this dish spicier by adding additional arrabiata sauce, or dried red pepper flakes. I like it just as it is in this recipe. This recipe will easily feed five to six people.

Ingredients

MARINADE

1/2 cup dry sherry (I used 1/2 cup white grape juice and 1 teaspoon wine vinegar)
4 tablespoons olive oil, divided
3 garlic cloves, minced
1 teaspoon dried oregano
1 1/2 pounds boneless skinless chicken breasts, cubed

SAUCE:

2 tablespoons butter
1/2 medium sweet red and green pepper, chopped
1 medium onion, chopped
2 garlic cloves, minced
1 15 ounce can Italian diced tomatoes
1 1/2 cups arrabiata sauce
1/4 teaspoon salt
1/8 teaspoon pepper
1 box (16 ounces each) uncooked rigatoni
1-1/2 cups heavy whipping cream
4 ounces cream cheese, cut up
1/4 cup chopped fresh basil
1-1/2 cups grated Romano cheese

Directions

1. In a large resealable plastic bag, combine sherry, 2 tablespoons oil, garlic and oregano. Add chicken; seal bag and turn to coat. Refrigerate 1 hour.

2. Drain chicken, discarding marinade. Heat 2 tables olive oil in a Dutch oven over medium-high heat. Add chicken in batches; cook and stir until no longer pink. Remove from pan.

3. In same pan, heat butter over medium-high heat. Add peppers, onion and garlic; cook and stir until tender. Stir in diced tomatoes, arrabiata sauce, salt and pepper; bring to a boil. Reduce heat; simmer 8-10 minutes or until slightly thickened, stirring occasionally. Add chicken; heat through.

4. Meanwhile, in a stockpot, cook rigatoni according to package directions. In a small saucepan, combine cream and cream cheese over medium heat; cook and stir until blended. Add to chicken mixture; stir in Romano cheese.

5. Drain rigatoni; return to stockpot. Add sauce to pasta; toss to combine.

6. Plate pasta and sprinkle with fresh chopped basil.

Variations of this recipe on the Internet call for a much spicier version—too spicy for me. If you want to easily control the spiciness of the recipe you can add additional arrabiata sauce to taste.

If you try this recipe, I would love for you to post a comment and let me know what you think!
Wednesday, January 23, 2019

Hungarian Chicken Paprikash

I'm sorry I didn't take any pictures, but this recipe for Hungarian Chicken Paprikash turned out so well, that I decided I had to share it. I looked at several different recipes for Chicken Paprikash, and there are many out there, but this one is easy and mighty tasty. I used crushed tomatoes from Italy for the first time, thinking they were like petite diced tomatoes. They are not. They are more like a thick tomato sauce, but that works for this recipe. I would love to hear back from you if you try this recipe. The recipe will serve 4-6 people.

Adam’s Hungarian Chicken Paprikash

Ingredients

6 chicken thighs
3 tablespoons flour
2 teaspoons Montreal Steak Seasoning
2 teaspoons paprika
2 tablespoons olive oil
2 tablespoons butter, divided
6 skin-on, bone-in chicken thighs
1 medium Vidalia onion, quartered and sliced
1 medium sweet red pepper, sliced
2-3 tablespoons paprika (I used 2. Pretty mild. Next time I will use 3.)
1 15 oz. can crushed Italian tomatoes
1 1/2 cups lower sodium chicken broth
Salt and pepper to taste
3/4 to 1 cup sour cream
Serve with extra-wide egg noodles, spaetzle, or homemade dumplings.

Directions

In a gallon-size plastic bag, combine flour, steak seasoning, and 2 teaspoons paprika. Add chicken thighs and shake well to ensure chicken has been floured. Set aside chicken. Discard leftover seasoning.

In a large frying pan, heat 2 tablespoons olive oil and 1 tablespoon butter. When butter starts to sizzle, add chicken thighs, skin-side down. Brown on both sides, about 10 minutes. Set chicken aside and pour out all but about 1 tablespoon oil.

Add onion and red pepper to frying pan and saute for about 5 minutes. Add remaining tablespoon of butter if necessary. Stir in paprika and continue to sauté for another 5 minutes. Add can of tomatoes and the chicken broth. Stir and heat to a boil. Reduce heat and add chicken thighs. Cover and cook for about 35 minutes, turning chicken twice.

While chicken is cooking, prepare noodles, spaetzle or dumplings. After draining them add a bit of butter and chopped Italian parsley if desired.

Remove chicken from sauce.

In a small bowl combine sour cream with about 1/2 cup of the sauce. Then add sour cream mixture into frying pan. Stir until smooth. Add salt and pepper to taste.

On a serving plate or individual plates, add the starch and the chicken. Spoon sauce over the chicken and serve.

Tuesday, September 25, 2018

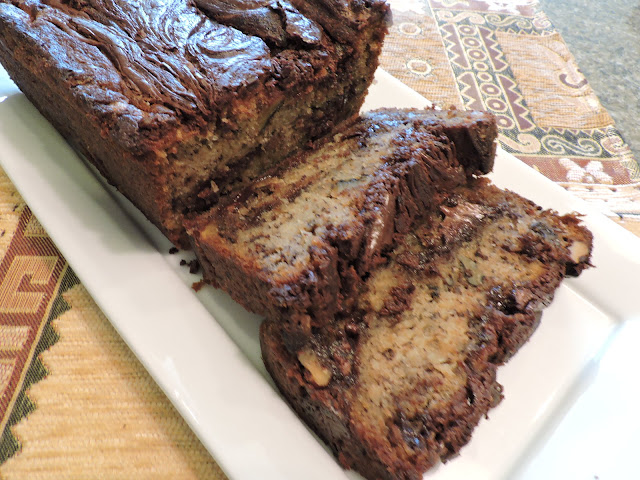
Banana Nut Bread with Nutella Swirls

Banana Nut Bread with Nutella Swirls

I associate scents with memories. I once smelled recently cut grass while riding an elephant in Thailand and immediately I experienced intense thoughts of childhood on the farm in Willis, Michigan.

When I am baking coffeecakes and breads and I start to smell good things in the oven my thoughts go immediately to my grandmother’s house on Florida Street in Detroit and the niche beside the stairway to the attic, where all the baking bowls and pans were stored. Those mostly ceramic bowls from the size of a teacup to a small washtub intrigued me. I can still smell the raw wood of the attic, the mothballs kept in the linens and the faint aromas of cakes and breads, pies and cookies.

There is nothing better than the aroma of banana bread baking in the oven. Delicious as it is on its own, I have found a recipe that improves even the best banana bread—the addition of swirls of Nutella! Chocolate and hazelnuts and banana. I can almost smell that banana bread baking in the oven right now!

Nutella and bananas for Banana Nut Bread. Yum!
Banana Nut Bread with Nutella Swirls

Ingredients

2 cups all-purpose flour

1 teaspoon baking soda

1/2 teaspoon salt

1 cup (2 sticks) unsalted butter at room temperature

1 cup granulated sugar

2 large eggs

1 teaspoon vanilla

4 overripe bananas, mashed (about 1-1/2 cups)

2/3 cup coarsely chopped walnuts, toasted

1 cup Nutella

Instructions

Preheat oven to 350°F. Lightly grease and flour a 9×5-inch loaf pan and set aside.

Sift together flour, baking soda, and salt.

Using an electric mixer beat the sugar and butter until fluffy. Add the eggs, then the vanilla. Beat until well combined. Stir in the flour, baking soda, and salt. Fold in the mashed bananas until just combined. Stir in walnuts.

Spread one third of the batter evenly into the bottom of the prepared pan. Spoon one third of a cup of Nutella over the batter in the pan and then swirl through the batter with a table knife. Place one third of the remaining batter evenly over the first layer and swirl with one third of a cup of the remaining Nutella. Spread the remaining batter evenly over the top and top with the remaining one third of a cup of Nutella. Swirl through the batter with a table knife.

Place loaf pan on a baking sheet and bake for 60-70 minutes or until golden brown and a toothpick inserted in the center comes out clean. Let the bread cool in the pan for at least 30 minutes before removing to a wire rack to cool completely.

Do not slice banana bread until completely cool---at least 3 to 4 hours or overnight (You probably won’t be able to wait that long!)

Saturday, June 30, 2018

Razzleberry Pie Recipe

Razzleberry Pie
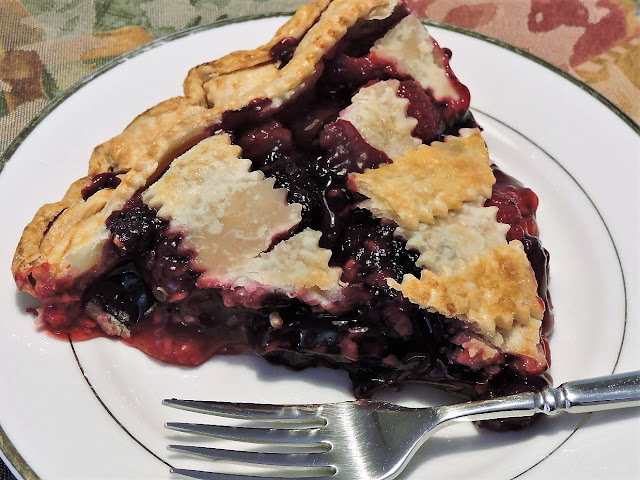
Homemade Razzleberry Pie with raspberries, blackberries and blueberries.
There is no such thing as a razzleberry, but a well-made Razzleberry Pie is scrumptious! Growing up in Michigan we had easy access to tangy raspberries that grew on the farm. Plump and juicy blackberries that stained your fingers purple when you picked them in the woods were hard to get, but, if the season was good, were worth the scratched-up arms and legs to get a pail full. Blueberries were harder to find, usually only available in the wilds of northern Michigan, but our neighbor planted some bushes in his garden—they weren’t as sweet as the wild berries, but we made do! All three berries ended up in pies or tarts of some variation, but I don’t remember mixing them when we were kids.

I don’t know how it came up, but a recent visitor from Ohio mentioned that her family loved the frozen Marie Callender “Razzleberry” Pie. The pie included raspberries, blackberries, and blueberries. Berries were on sale in the supermarket so I decided that I would make my own version and include a new thickening agent, Carnaby’s Ultra Gel, which I had never used before. Supposedly this gluten free corn-based product will “instantly thicken sauces, gravies, desserts and more!” while providing a clear, non-starchy, consistency that will not leave a starchy aftertaste. I will vouch for it! My Razzleberry Pie turned out great. The consistency of the berry filling wasn’t watery or gummy, but smooth and thick and the flavor of the berries really stood out.

Razzleberry Pie
A Razzleberry Pie fresh out of the oven.
RAZZLEBERRY LATTICE PIE

INGREDIENTS:
1 double crust pie crust (I used Pillsbury Refrigerated crusts)
2 pints raspberries
2 pints blackberries
1 pint blueberries
3/4 to 1 cup sugar
1/3 cup Cornaby’s Ultra Gel (bought on Amazon)
1/3 cup water
1 egg
1 teaspoon milk
1 tablespoon sugar
Butter-flavor spray

DIRECTIONS:

Roll out one pie crust a 9” pie plate, sprayed lightly with butter-flavor spray. Refrigerate until ready to use.
Prepping the berries for pie.
Preheat the oven to 400 degrees. Place a cookie sheet lined with tinfoil on the bottom oven rack.

Combine berries with 1/3 cup water. Stir together sugar and ultra gel, then mix thoroughly with berries.  Spoon berry mixture into bottom pie crust.

Cut remaining pie crust into one-inch lattice strips.

Place strips across the pie and then lift one end of every other strip and lay a new strip across the other way. Repeat with the other strips that were not originally lifted. Continue until you’re halfway across the pie then turn the pie around and repeat from the other side to make a lattice across the entire pie.

Whisk together the egg and water and then brush the top of the pie and immediately sprinkle with sugar.
Prepping the lattice crust for the berry pie. I was in a hurry and did a sloppy job.
Place pie in oven and immediately reduce heat to 375 degrees. Bake the pie for 25 minutes. Checking halfway through to see if the pie is browning properly. If necessary, place a piece of tinfoil around the edge of the pie and continue to bake for another 20-30 minutes, or until the filling is bubbly and the crust is golden brown.

Remove from the oven and cool completely. Serve with vanilla ice cream.

Note: Here's a pic of the package of Cornaby's Ultra Gel (They've changed the name to E-Z Gel but it's the same thing, which I used to thicken the pie. It worked great and I can't wait to try it in my apple pie recipe!


Wednesday, May 2, 2018

Even Better Than McDonald's Oatmeal Raisin Cookies

Even Better Than McDonald's Oatmeal Raisin Cookies
Even Better Than McDonald's Oatmeal Raisin Cookies straight from the oven!
I've been working on this recipe for weeks now, scouring the internet for copycat  recipes of my favorite cookie--McDonald's Oatmeal Raisin Cookies. Each time I made them they were mighty tasty but very flat--they didn't look like McDonald's cookie at all and the crunch wasn't there. Finally, I found an ingredients list for the oatmeal raisin cookie and added coconut and cornflakes to the mix. I did keep the Toffee Bits that were listed on the copycat recipe, but not on the ingredients list. I think it gives the cookies another layer of flavor--that's why I am calling this recipe the "Even Better Than McDonald's Oatmeal Raisin Cookies". I made some other tweaks to the recipe to get the color and texture right and have come up with what I think is a darned good oatmeal raisin cookie recipe. I would love to hear what you think, when you make them!

"Even Better Than McDonald's Oatmeal Raisin Cookies

Ingredients

1/2 cup butter, softened

1/2 cup margarine, softened

1 cup brown sugar

1/2 cup white sugar

2 eggs

1 tablespoon vanilla extract

1 3/4 cup all-purpose flour

2 teaspoons baking powder

1/2 teaspoon ground cinnamon

1/2 teaspoon salt

2 cups rolled oats, quick-cooking (not instant)

1 cup raisins

1/2 cup coconut, chopped

1 cup cornflakes, crushed (measure cornflakes, then crush them)

1/2 cup toffee bits

Directions

Preheat oven to 350 degrees.

In a large bowl or mixer, cream together the butter and sugars. Add eggs one at a time and beat, then add vanilla.

Combine flour, baking powder, cinnamon and salt. Gradually add into wet mix.

Stir together oatmeal, raisins, coconut, cornflakes and toffee bits. Stir into wet mix.

Refrigerate for at least two hours or overnight.

Roll into 1 inch balls and place on parchment-lined sheet pan. Gently tamp down the cookie before baking.

Bake for 10 to 12 minutes (oven time will vary based on size).

Let cookies cool on baking sheet for 5 minutes. Transfer to cooling rack.

These oatmeal raisin cookies spread better
when they bake if you gently tamp down the raw cookie dough
before baking.