Tuesday, September 25, 2018

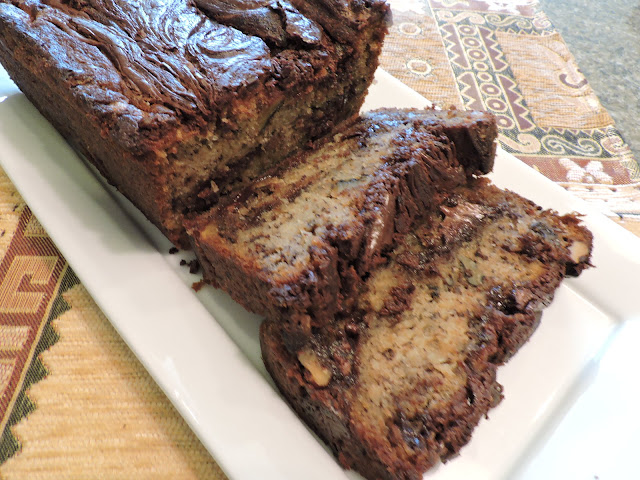
Banana Nut Bread with Nutella Swirls

Banana Nut Bread with Nutella Swirls

I associate scents with memories. I once smelled recently cut grass while riding an elephant in Thailand and immediately I experienced intense thoughts of childhood on the farm in Willis, Michigan.

When I am baking coffeecakes and breads and I start to smell good things in the oven my thoughts go immediately to my grandmother’s house on Florida Street in Detroit and the niche beside the stairway to the attic, where all the baking bowls and pans were stored. Those mostly ceramic bowls from the size of a teacup to a small washtub intrigued me. I can still smell the raw wood of the attic, the mothballs kept in the linens and the faint aromas of cakes and breads, pies and cookies.

There is nothing better than the aroma of banana bread baking in the oven. Delicious as it is on its own, I have found a recipe that improves even the best banana bread—the addition of swirls of Nutella! Chocolate and hazelnuts and banana. I can almost smell that banana bread baking in the oven right now!

Nutella and bananas for Banana Nut Bread. Yum!
Banana Nut Bread with Nutella Swirls

Ingredients

2 cups all-purpose flour

1 teaspoon baking soda

1/2 teaspoon salt

1 cup (2 sticks) unsalted butter at room temperature

1 cup granulated sugar

2 large eggs

1 teaspoon vanilla

4 overripe bananas, mashed (about 1-1/2 cups)

2/3 cup coarsely chopped walnuts, toasted

1 cup Nutella

Instructions

Preheat oven to 350°F. Lightly grease and flour a 9×5-inch loaf pan and set aside.

Sift together flour, baking soda, and salt.

Using an electric mixer beat the sugar and butter until fluffy. Add the eggs, then the vanilla. Beat until well combined. Stir in the flour, baking soda, and salt. Fold in the mashed bananas until just combined. Stir in walnuts.

Spread one third of the batter evenly into the bottom of the prepared pan. Spoon one third of a cup of Nutella over the batter in the pan and then swirl through the batter with a table knife. Place one third of the remaining batter evenly over the first layer and swirl with one third of a cup of the remaining Nutella. Spread the remaining batter evenly over the top and top with the remaining one third of a cup of Nutella. Swirl through the batter with a table knife.

Place loaf pan on a baking sheet and bake for 60-70 minutes or until golden brown and a toothpick inserted in the center comes out clean. Let the bread cool in the pan for at least 30 minutes before removing to a wire rack to cool completely.

Do not slice banana bread until completely cool---at least 3 to 4 hours or overnight (You probably won’t be able to wait that long!)

Saturday, June 30, 2018

Razzleberry Pie Recipe

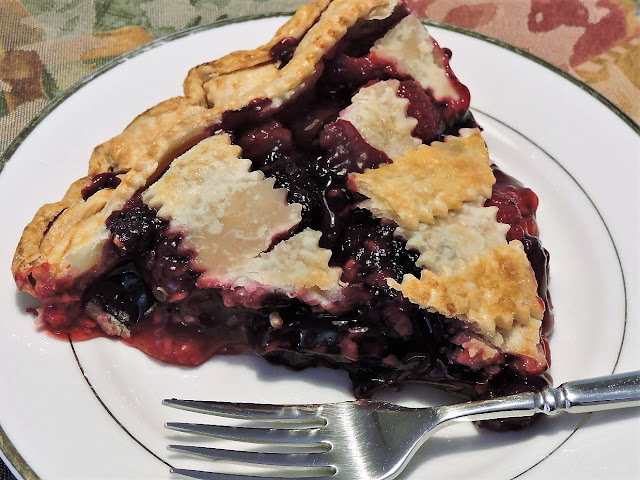
Razzleberry Pie
Homemade Razzleberry Pie with raspberries, blackberries and blueberries.
There is no such thing as a razzleberry, but a well-made Razzleberry Pie is scrumptious! Growing up in Michigan we had easy access to tangy raspberries that grew on the farm. Plump and juicy blackberries that stained your fingers purple when you picked them in the woods were hard to get, but, if the season was good, were worth the scratched-up arms and legs to get a pail full. Blueberries were harder to find, usually only available in the wilds of northern Michigan, but our neighbor planted some bushes in his garden—they weren’t as sweet as the wild berries, but we made do! All three berries ended up in pies or tarts of some variation, but I don’t remember mixing them when we were kids.

I don’t know how it came up, but a recent visitor from Ohio mentioned that her family loved the frozen Marie Callender “Razzleberry” Pie. The pie included raspberries, blackberries, and blueberries. Berries were on sale in the supermarket so I decided that I would make my own version and include a new thickening agent, Carnaby’s Ultra Gel, which I had never used before. Supposedly this gluten free corn-based product will “instantly thicken sauces, gravies, desserts and more!” while providing a clear, non-starchy, consistency that will not leave a starchy aftertaste. I will vouch for it! My Razzleberry Pie turned out great. The consistency of the berry filling wasn’t watery or gummy, but smooth and thick and the flavor of the berries really stood out.

Razzleberry Pie
A Razzleberry Pie fresh out of the oven.
RAZZLEBERRY LATTICE PIE

INGREDIENTS:
1 double crust pie crust (I used Pillsbury Refrigerated crusts)
2 pints raspberries
2 pints blackberries
1 pint blueberries
3/4 to 1 cup sugar
1/3 cup Cornaby’s Ultra Gel (bought on Amazon)
1/3 cup water
1 egg
1 teaspoon milk
1 tablespoon sugar
Butter-flavor spray

DIRECTIONS:

Roll out one pie crust a 9” pie plate, sprayed lightly with butter-flavor spray. Refrigerate until ready to use.
Prepping the berries for pie.
Preheat the oven to 400 degrees. Place a cookie sheet lined with tinfoil on the bottom oven rack.

Combine berries with 1/3 cup water. Stir together sugar and ultra gel, then mix thoroughly with berries.  Spoon berry mixture into bottom pie crust.

Cut remaining pie crust into one-inch lattice strips.

Place strips across the pie and then lift one end of every other strip and lay a new strip across the other way. Repeat with the other strips that were not originally lifted. Continue until you’re halfway across the pie then turn the pie around and repeat from the other side to make a lattice across the entire pie.

Whisk together the egg and water and then brush the top of the pie and immediately sprinkle with sugar.
Prepping the lattice crust for the berry pie. I was in a hurry and did a sloppy job.
Place pie in oven and immediately reduce heat to 375 degrees. Bake the pie for 25 minutes. Checking halfway through to see if the pie is browning properly. If necessary, place a piece of tinfoil around the edge of the pie and continue to bake for another 20-30 minutes, or until the filling is bubbly and the crust is golden brown.

Remove from the oven and cool completely. Serve with vanilla ice cream.

Note: Here's a pic of the package of Cornaby's Ultra Gel (They've changed the name to E-Z Gel but it's the same thing, which I used to thicken the pie. It worked great and I can't wait to try it in my apple pie recipe!


Wednesday, May 2, 2018

Even Better Than McDonald's Oatmeal Raisin Cookies

Even Better Than McDonald's Oatmeal Raisin Cookies
Even Better Than McDonald's Oatmeal Raisin Cookies straight from the oven!
I've been working on this recipe for weeks now, scouring the internet for copycat  recipes of my favorite cookie--McDonald's Oatmeal Raisin Cookies. Each time I made them they were mighty tasty but very flat--they didn't look like McDonald's cookie at all and the crunch wasn't there. Finally, I found an ingredients list for the oatmeal raisin cookie and added coconut and cornflakes to the mix. I did keep the Toffee Bits that were listed on the copycat recipe, but not on the ingredients list. I think it gives the cookies another layer of flavor--that's why I am calling this recipe the "Even Better Than McDonald's Oatmeal Raisin Cookies". I made some other tweaks to the recipe to get the color and texture right and have come up with what I think is a darned good oatmeal raisin cookie recipe. I would love to hear what you think, when you make them!

"Even Better Than McDonald's Oatmeal Raisin Cookies

Ingredients

1/2 cup butter, softened

1/2 cup margarine, softened

1 cup brown sugar

1/2 cup white sugar

2 eggs

1 tablespoon vanilla extract

1 3/4 cup all-purpose flour

2 teaspoons baking powder

1/2 teaspoon ground cinnamon

1/2 teaspoon salt

2 cups rolled oats, quick-cooking (not instant)

1 cup raisins

1/2 cup coconut, chopped

1 cup cornflakes, crushed (measure cornflakes, then crush them)

1/2 cup toffee bits

Directions

Preheat oven to 350 degrees.

In a large bowl or mixer, cream together the butter and sugars. Add eggs one at a time and beat, then add vanilla.

Combine flour, baking powder, cinnamon and salt. Gradually add into wet mix.

Stir together oatmeal, raisins, coconut, cornflakes and toffee bits. Stir into wet mix.

Refrigerate for at least two hours or overnight.

Roll into 1 inch balls and place on parchment-lined sheet pan. Gently tamp down the cookie before baking.

Bake for 10 to 12 minutes (oven time will vary based on size).

Let cookies cool on baking sheet for 5 minutes. Transfer to cooling rack.

These oatmeal raisin cookies spread better
when they bake if you gently tamp down the raw cookie dough
before baking.


Saturday, March 10, 2018

My Second Mother

In 1963 we moved from the farm to the “suburbs” where my father built a home in a new development called “Belle Harbor” just north of the town of Belleville, Michigan. Our new neighbors, Ernie and Pat Ryback and their three sons, moved there from the outskirts of Detroit.

Pat Ryback: My Second Mother
I consider Pat Ryback my second mother, and she considers me her fourth son. A whirlwind of activity always surrounded Pat. After her three sons were out of middle school, she returned to university and received a degree in library science. Pat was always working on something: creating learning activities for school, hosting dinner parties, shepherding foreign exchange students, providing advice to anyone within earshot whether they wanted advice or not.

The Ryback boys were my friends. From an isolated childhood on the farm, I now had three boys as friends. The Rybacks had a pool. It was great fun, although I was deathly afraid as I could not swim. I never really learned. We had great times: putting on shows for neighborhood kids, playing endless board games in the summer, chasing each other in the pool.

The summer of 1972 was a wild one for me.  I graduated from Eastern Michigan University in May. I worked for a congressman during the day and as an auditor at a Howard Johnson’s Motel at night. In between, I applied for teaching positions across the state of Michigan. I ran from one interview to another. I don’t remember sleeping.

In September, I realized I was lost. I no longer worked for the congressman. Howard Johnson’s changed management and I quit—the new management did not want to pay me for the hours I had worked. The opportunity of working as a graduate assistant was gone. No one wanted me as a teacher because I couldn’t coach football, basketball, or cross country. It was the Vietnam era when history and political majors like me were a dime a dozen.

On Saturday night of Thanksgiving weekend, I sat in Pat Ryback’s family room drinking German white wine and grilling Turkish shish kebabs in the fireplace, listening to an Italian opera on the stereo. These were portents of adventures to come (I would come to live in Germany, Turkey, and visit Italy several times). It was getting late, maybe 10 o’clock. Pat gave me grief for not following her advice and minoring in library science at university.

Pat asked me what I wanted to do with my life, and I told her I had no clue. She said, “I think you should go to library school!” She plugged in her phone and called the Dean of the University of Michigan Library School, waking him up. “I have an outstanding person for library school,” she said. “OK,” said the groggy Dean. “I’ll meet him on Tuesday. Have him bring his transcripts.” When Pat talked, people listened.

On Tuesday, I met with the Dean of the Library School at the University of Michigan. He looked over my transcripts. “The University of Michigan requires a foreign language for a Master’s Degree program. You don’t have it?” It was waived. “The University of Michigan graduate program requires a 3.5 academic level. You don’t have it?” It was waived. “The University of Michigan school library program, however, needs men. You’re in! If Pat Ryback recommends a student we accept them!”

In January of 1973, I entered library school at the Masters Degree level at the prestigious University of Michigan—a school my counselors at Belleville High School, just four years earlier, would never have considered a possibility for me.

Obtaining the degree in Library Science would end up defining my life, opening doors of opportunity across the world.

Thank you, Pat, my second mother. You saw something in me that others did not and it has made all the difference.

Happy Mother’s Day!

Dumplings and homemade noodles of all types were found in Polish American houses in the Detroit area. From big, fat, filled pierogi, to delicate egg noodles served in chicken soup.

Homemade Chicken Soup with Chicken Liver Dumplings (Wątrobiane kluski do rosołu)

I learned how to make these dumplings at Pat’s house when I was about 13 years old. They have been a favorite ever since! Don’t let the fact that they are made from liver deter you from trying these dumplings. The taste is very mild, but very rich.

Pat Ryback’s Chicken Liver Dumplings

1 cup chicken livers, finely chopped
1 cup flour
2 tablespoons Italian parsley finely chopped
1 tablespoon grated onion
1/2 teaspoon salt
1/2 teaspoon pepper

Combine ingredients and stir well.

Bring a large pan of water to a boil. Add 1 teaspoon salt.

Spoon teaspoonfuls of dumpling batter into boiling water. Do in batches. Do not crowd dumplings.

Stir occasionally until noodles come to the top, about 5 minutes.

Remove noodles to a colander and gently rinse with cold water.

These are delicious served with homemade chicken soup.


Thursday, January 11, 2018

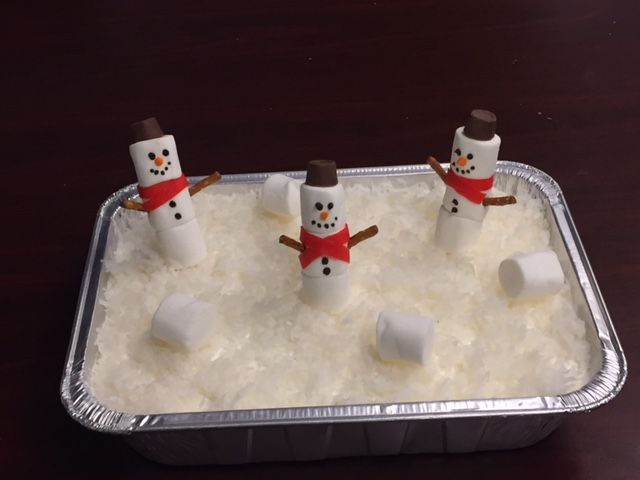
Coconut Poke Cake with Marshmallow Snowmen


Coconut Poke Cake with Marshmallow Snowmen

I served a Coconut Poke Cake at a Murder Mystery Dinner held at my church, St. John the Apostle, MCC, on March 17, 2017. To make it go with the St. Patrick's Day theme, I sprinkled tiny green candy shamrocks I found on Amazon.com. This is a great party cake, but note that it is a bit on the ooey, gooey, side. I made it again for my husband’s work Christmas Party this year, adding marshmallow snowmen on top. It was a big hit!

24 servings

1 (18.25 ounce) package white cake mix
1 (14 ounce) can cream of coconut  (NOT coconut milk)
1 (14 ounce) can sweetened condensed milk
1 (16 ounce) package frozen whipped topping, thawed
1 (8 ounce) package flaked coconut

Directions

Prepare and bake white cake mix according to package directions. Remove cake from oven. While still hot, using a utility fork, poke holes all over the top of the cake.

Mix cream of coconut and sweetened condensed milk together. Pour over the top of the still hot cake.

Let cake cool completely then frost with the whipped topping and top with the flaked coconut. 

Refrigerate at least 4 hours before serving.

Notes: I have also make this recipe using real whipped cream rather than whipped topping—either way it is terrific!

Marshmallow Snowmen
Marshmallow Snowmen
Marshmallow Snowmen in transport!

The directions are for three snowmen.

9 large marshmallows
3 pretzel sticks broken in half
3 Rolo chocolate covered caramels
3 pieces of red fruit rolloups
Black decorator icing
Orange decorator Icing
3 8-inch bamboo skewers

Thread 3 marshmallows on to bamboo skewer with pointed side up leaving room for the Rolo. Push the Rolo caramel, wide side down, on top of the skewer to make the hat.

Use a skewer to create a 1/2 inch deep hole on either side of the middle marshmallow. Insert 1 piece of pretzel stick on each side to create arms.

Trim fruit rollup to 1/4 inch wide by about 4 inch pieces to form scarf on top of the middle marshmallow.

Use black icing with pointed tip decorating tube to form eyes, mouth and buttons on the snowman. 

Use orange icing with pointed tip to create the “carrot” nose. Refrigerate for a couple of hours to allow icing to set.

Insert snowmen, skewer side down into top of cake.

Note: You could vary the colors by using gum drops for a hat with different color fruit rolloups.