Tuesday, July 29, 2025

Sheet Pan Hidden Valley Ranch Restaurant Style Chicken Thighs and Vegetables

I made this dish for supper this evening and it got excellent reviews. It was so easy and so flexible I'll be making this again. Already thinking of different vegetable combinations to use. One recommendation, do not add more that the listed amount of Hidden Valley Ranch Seasoning otherwise it will be too salty.

So easy, so delicious, and so flexible!

Sheet Pan Hidden Valley Ranch Restaurant Style Chicken Thighs and Vegetables

INGREDIENTS

4 bone-in skin-on chicken thighs

4 tablespoons olive oil, divided

1 .04 ounce packet Hidden Valley Ranch Restaurant Style Dressing,

1 garlic clove, minced

1 12 to 16 ounce package of mixed vegetables (I used a medley that included baby carrots, broccoli, and cauliflower. This recipe may be adapted to vegetables your family prefers.)

1 half onion, cut in half from stem to root, peeled and trimmed, then cut into thin strips from cell to root.

Note: I had a leftover half of a green pepper that I also sliced into the mix.

Packet of Dressing

DIRECTIONS

Set oven to 400 degrees.

Cover a sheet pan with tin foil. Lightly spray with olive oil spray.

In a large bowl, combine chicken thighs and 2 tablespoons olive oil. Stir until chicken is coated with olive oil. Sprinkle both sides of chicken with half a packet of Hidden Valley Ranch Restaurant Style Dressing. Stir until chicken is well coated with dressing mix.

Place chicken on cookie sheet and bake, skin-side down for 25 minutes.

While chicken is baking, in a large bowl combine 2 tablespoons olive oil, remaining packet of Hidden Valley Ranch Restaurant Style Dressing, minced garlic, package of mixed vegetables, and sliced onions. Stir until all vegetables are covered with oil.

Remove chicken from oven. Flip over chicken so that the skin side is up. Place vegetables  in open spaces around the chicken thighs.

Return chicken to oven and continue baking for another 25 minutes. Skin should be crispy on top.

Remove from oven and serve.


Sunday, May 4, 2025

J. L. Hudson's Maurice Salad

J. L. Hudson was a Department Store in downtown Detroit. I loved that store, especially the elevators, who were manned by ladies that announce the floor number. They may have announced what departments were on a particular floor, but I don't remember for sure.

The store had a very nice in-house restaurant and they served a salad called Maurice Salad. If you would like more information on the salad, its history, where you can find restaurants that have it on the menu, and a recipe for the salad click here.

I made the salad a couple of days ago, shortly after Easter. It was a good way to use up some of the leftover ham and hard boiled eggs. Enjoy!

Maurice Salad
The very delicious Maurice Salad, originally served
 at the restaurant in the J.L. Hudson's Department Store, 
in Detroit, Michigan.


Saturday, January 4, 2025

Dairy Free Double Chocolate Cake with Dairy Free Peanut Butter Icing

I volunteered to bake a cake to celebrate an anniversary and one person could not eat dairy. I searched for recipes that would be mindful of the requirement, yet tasty to all of the guests at the party. This was the end result, and I actually think it was better than other chocolate cakes I’ve made in the past. Serious bakers will recognize it as basically a “Depression” or “Wacky” cake, which I modified to my own taste. The end result was a very moist and tasty cake!

Delicious Dairy-Free Chocolate Cake with Peanut Butter Icing


Dairy Free Double Chocolate Cake with Dairy Free Peanut Butter Icing

Ingredients

For the cake:

2 1/4 cups all-purpose flour

1 1/8 cup granulated sugar

1/2 cup unsweetened cocoa powder

1 1/2 teaspoon baking soda

3/4 teaspoon salt

½ cup vegetable oil

1 1/2 tablespoon apple cider vinegar

1 tablespoon vanilla extract

1 1/2 cups brewed coffee at room temperature

1/3 cup dairy-free chocolate morsels

Baking spray

Directions

Preheat the oven to 350 degrees. Lightly spray a 9x13 inch baking pan with baking spray.

Sift together the flour, sugar, cocoa powder, baking soda and salt. Whisk the mixture until evenly combined. Make 1 large well in the center of the cake, and 2 small wells on either side of the large one. Pour the oil into the large well, the vanilla into one of the small wells, and the vinegar into the other small well. Pour the coffee evenly over everything in the bowl. With an electric mixer blend the entire mixture until just combined. Stir in chocolate morsels. Pour into baking pan and spread evenly.

Bake for 25-30 minutes, until a toothpick inserted in the center of the cake comes out clean. Let the cake cool in the pan on a wire rack about 2 hours

Dairy-Free Peanut Butter Frosting

Ingredients

1 cup creamy peanut butter

3/4 cup salted vegan butter (I like Miyoko’s Plant Butter)

2 teaspoons pure vanilla extract

2 cups powdered sugar, sifted

2-3 tablespoons unsweetened, plain non-dairy milk (I found I didn’t need it and added more powdered sugar)

Instructions

Cream together the peanut butter and plant butter with an electric mixer fitted with the paddle or whisk attachment.

Add vanilla and 1 cup of powdered sugar. Continue to mix gradually increasing the speed until the sugar is fully incorporated. Add remaining powdered sugar. Mix until smooth and creamy. If not firm enough add an additional 1/4 cup of sifted powdered sugar or if too thick whisk in the milk one tablespoon at a time, if needed, until the frosting is light and fluffy.

Refrigerate until ready to serve.

Tuesday, October 29, 2024

Chocolate! Chocolate! Chocolate! Cake

I often bake cakes for groups which require a large baking pan that would allow for a minimum of 24 servings. I found that iChef makes a Handi-foil 15x10 bake pan with lid (you can find it on line) that works perfectly. Although it is disposable, I have used a pan at least 4-5 times without damage, just be careful when you are cutting a cake into serving pieces. I especially like that the bottom and sides are smooth to that it can be used it for cakes. Note: I always place a cookie sheet under the pan before baking or when transporting the cake. The high lid is also convenient for frosting the cake and travelling to and from a venue if needed. 

The title of this recipe comes from its layers, chocolate cake, chocolate pudding, and chocolate pudding-flavored Cool Whip. I baked a test cake and found that the pudding and pudding/Cool Whip layers, while tasty, didn’t hold their shape very well. That is the reason I added the gelatin to both the pudding and pudding/ pudding and cream mixtures. It was very easy to cut and serve the cake and it looks very pretty, as well.

chocolate cake
I apologize for the quality of the picture. It was the last piece of cake
that I could snag so that I could take a picture!

Chocolate! Chocolate! Chocolate! Cake for a Crowd

INGREDIENTS

1 box chocolate cake mix plus ingredients called for on the box

2 5.9 ounce boxes instant chocolate or chocolate fudge pudding mix

2 envelopes unflavored gelatin

4 tablespoons cold water, divided

5 cups milk, divided

1/2 cup powdered sugar

One 16 ounce tub whipped topping

1 can whipped cream

Chocolate shavings or mini chocolate chips ( optional)

DIRECTIONS

Preheat oven to 350 degrees.

Spray a 15-inch by 10-inch pan with baking spray.

Mix the chocolate cake mix according to directions on the box. Pour cake batter into pan.

Bake for 20 minutes. Remove cake from oven and use a toothpick to check for doneness. The toothpick should come out clean. Do not overbake.

Use the handle of a wooden spoon or a large straw to poke holes into the cake; set aside. (I use a chopstick).

Pour 1 packet (about 2 1/2 teaspoons) gelatin into a cup. Add 2 tablespoons of cool water. Stir gently to be sure all of the gelatin is wet. Set aside.

In a mixing bowl, combine 1 packet of the instant chocolate pudding mix with 2 and 1/2 cups of cold milk. Stir gently until combined.

Heat 1/2 cup milk until warm, but not hot. Add gelatin and whisk until gelatin is dissolved. Using a mixer beat the chocolate pudding with the milk and gelatin for at least 2 minutes. Pudding mixture should begin to thicken.

Once the pudding is thickened, spoon it evenly over the cake, then place cake in the refrigerator to chill for an hour.

Prep second packet of gelatin in the same way as the first. Set aside.

In a large mixing bowl, beat together the other box of pudding mix, powdered sugar and remaining 1 and 1/2 cup of milk.

Using a mixer beat the chocolate pudding with the milk and gelatin for at least 2 minutes. Pudding mixture should begin to thicken. Fold in the whipped topping then spread evenly over the cake.

Refrigerate the cake for at least 4 hours before serving. Better yet, let it chill overnight.

Optional: Top the pieces of cake with canned whip cream and add chocolate shavings or mini chocolate chips on top.

Friday, October 25, 2024

Plum Coffeecake ((Placek z Sliwkami)

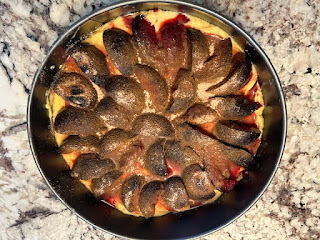
Plum Coffeecake dusted with confectioners' sugar ready for company!


This recipe is a variation on one that has regularly appeared in the New York Times, usually in September, and reminds me of coffeecakes my Polish grandmother and aunt would make when I was a child. In Polish, it is called Placek z Sliwkami. It is based on the use of prune or Italian plums, which are difficult to find, so when I spot them in the supermarket, I have to make this torte. Please know that you can use other stone fruit, such as peaches, nectarines, or regular plums, you just have to cut them into smaller pieces. This recipe calls for prune plums that are halved.

I've also changed the recipe, using regular AP flour, and combining the cinnamon with the sugar rather than putting them on separately, as well as a couple of other changes that suit my taste.

This torte, or coffeecake, won't last long--it is that delicious!

Plum Coffeecake (Placek z Sliwkami)

INGREDIENTS

24 purple plums, pitted and halved (these are the small prune plums. If using regular plums, use about 9 plums, halved and placed on the batter halved side down.

1 tablespoon lemon juice

1 cup all-purpose flour, sifted

1 teaspoon baking powder

1/4 teaspoon salt (optional)

3/4 cup sugar

1/2 cup unsalted butter

1/2 teaspoon vanilla

2 eggs, slightly beaten

1/4 cup sugar combined with 1 teaspoon cinnamon, divided

2 tablespoons confectioners’ sugar, sifted (optional)

DIRECTIONS

Heat oven to 350 degrees.

Line a spring form pan, preferably 10 inches, with parchment paper. Spray with baking spray.

Sprinkle the plum halves with about 1 tablespoon lemon juice, and combine with about 1 tablespoon of the cinnamon sugar mixture.

Sift together flour, baking powder, and salt.

Cream the sugar, butter, and vanilla in a bowl. Add the flour, baking powder, salt and eggs and beat well.


Spoon the batter into the spring form pan and place on cookie sheet.

Place the plum halves skin side up on top of the batter.

Sprinkle remaining combined cinnamon and sugar over plums and batter.


Bake approximately one hour. Remove and cool. This cake can also be served lukewarm with whipped cream.

When cake is cool, dust with confectioners’ sugar before serving if desired.

(I like it as is, but the confectioners’ sugar makes it pretty for company).