Thursday, December 26, 2019

Spumoni Ice Cream Cake--A Christmas Tradition

Spumoni Ice Cream Cake
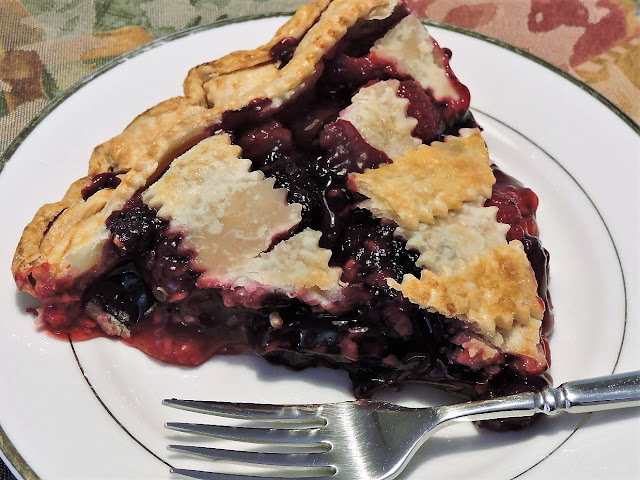
A slice of Spumoni Ice Cream Cake that was served on Christmas Eve at the little house on Florida Street in Detroit, Michigan.

I searched all over southwest Florida looking for Spumoni Ice Cream to serve at Christmas Dinner but couldn't find it. For some reason my Polish Aunt Sophie used to serve Spumoni, an Italian ice cream creation, either at Christmas Dinner or in the holiday season surrounding Christmas. We children thought the combination of flavors was very exotic. My recipe may not be exactly the same, but it is pretty close!

After giving up finding commercial Spumoni, I found a recipe on the Ben and Jerry's Ice Cream site for a Spumoni Ice Cream Cake. It was a good recipe, but I felt it need a little tweaking, one to add some orange flavoring to the chocolate layer, and two to figure out a way to make the cake easier to serve. I think I came up with good solutions for both. The ice cream cake was a big hit at Christmas dinner and the presentation at the table before serving was awesome!

Spumoni Ice Cream Cake

INGREDIENTS
1 pint Ben & Jerry’s Cherry Garcia ice cream*
1 pint Ben & Jerry’s Pistachio Pistachio ice cream*
1 pint Dutch Chocolate ice cream
2 tablespoons candied orange peel
1/2 teaspoon orange flavoring
1 box Ghiradelli Brownie Mix, made as directed in a baking pan larger than a 9x5 loaf pan

Topping:
1/4 cup Smuckers Magic Shell Chocolate

DIRECTIONS
Mix orange flavoring with candied orange peel and set aside.

Bake brownie mix as directed in a baking pan larger than a 9’x5 loaf pan. Allow to cool, then trim off edges to create a 9x5 piece of brownie. Wrap with tin foil and set aside.

Line 9x5 loaf pan with tin foil, overlapping sides so that you can use the foil as handles to remove the ice cream layers out of the pan.

Soften 1 pint of Cherry Garcia ice cream so it is soft enough to spread. Spread over bottom of loaf pan  and place in the freezer for 10-15 minutes, or until it's firm.

While that’s in the freezer, pull out another pint of ice cream to soften. Repeat step 2 for pistachio ice cream. Place in freezer.

Soften Dutch Chocolate ice cream and mix orange peel and orange flavoring in thoroughly. Freeze overnight.

To assemble, be sure that you can remove the ice cream layers out with the tin foil handles. You may have to run a knife around the edges to ensure removal. Remove from pan.

Put brownie layer on top of ice cream and then serving plate on top of brownie and very carefully flip it over. Remove tin foil.

Drizzle Magic Shell Chocolate over top. Put in freezer for about 5 minutes to allow shell to harden.

Cut into 1 inch slices to serve.

*Note: I got the idea for this dessert from the Ben and Jerry’s ice cream website and modified it. The result was delicious, but if you don’t have Ben and Jerry’s ice cream you could substitute a different brand of Cherry Almond and Pistachio ice creams.

Here is the link to the original recipe at Ben and Jerry’s.
Spumoni Ice Cream Cake


Monday, December 23, 2019

Christmas Cookie Collection 2019

Christmas Cookie Collection
Christmas Cookie Collection 2019

Friday, December 20, 2019

Polish Kolaczki


Polish Kolaczki, the last batch of Christmas cookies for 2019.

I seem to refine this recipe every year. This year I discovered the value of putting the discs of dough between layers of parchment paper. It made rolling out the dough much easier. I would take one disc out of the refrigerator at a time, dust it with the sugar mixture and roll out the dough between the paper. It worked great! 

Adam’s Polish Kolaczki

Ingredients
For the Pastry:

2 ¼ cups all purpose flour
½ teaspoon salt
8 oz cream cheese
1 cup unsalted butter, softened
1/3 cup granulated sugar and 1/3 cup of confectioners' sugar for rolling
1 can Solo brand Apricot filling

Sift flour and salt together in a medium bowl and set aside.

Beat the cream cheese and butter together with a stand mixer or a hand mixer until completely incorporated and creamy (3-5 minutes).

Reduce the speed of the mixer and slowly add in the flour. I used 5 additions and completely mixed in the flour each time. The dough will be soft but not sticky.

Divide the dough into 4 equal parts and flatten each to ¾” thick. Place discs between layers of parchment paper and refrigerate until hard, at least 2 hours.

Pre-heat the oven to 375°. Move the oven rack  in the center of the oven.


Sift together the granulated and confectioners' sugars.

Take one of the disks of dough from the refrigerator and lightly dust both sides with the sugar combination. Spread granulated sugar on your pastry board or work surface between layers of parchment paper. Roll out pastry to about 1/8” thick. 

With a pastry wheel or sharp knife, trim the dough into 2" squares.

Place a dollop of filling into the center of each square. I used ½ teaspoon to ¾ teaspoon for each.

Gently grab two opposite corners and fold one over the other, gently pressing down to try and seal them together. 

Gently move it to a parchment covered baking sheet. Repeat with all remaining squares, placing them about 1” apart.

Bake 12-14 minutes or until the bottom edges are golden. Do not overbake.

Let cool about 10 muntes on the pan on a wire rack and then move them gently to a wire rack to cool completely.

When cool, dust with confectioners' sugar. It was recommended to me to wait until I was ready to use the cookies before dusting them dusting them with the confectioners' sugar.

Walnut Filling
For the Walnut Filling:

2 cups freshly ground walnuts (finely)
1/2 cup sugar
1/4 cup of boiled milk
2 tablespoons melted butter
Mix filling in a medium bowl. The mixture should be thick. If the filling is not spreadable, use the rest of the milk. I used all of it. It will thicken as it sits.

Sunday, November 17, 2019

Pumpkin Crunch Cake

Pumpkin Crunch Cake
A yummy piece of Pumpkin Crunch Cake!

I didn't realize that I had never posted this recipe until it showed up as a memory in my Facebook page from 5 years ago. I ended up making it on Saturday and took it to church for our after service social. It disappeared in minutes.

It's a little bit messy--sort of like a pumpkin pie without a bottom crust, but everyone loves it. I think it would be even better with a nice scoop of vanilla ice cream, but it was gone before I had a chance to do a taste test!

Pumpkin Crunch Cake
Ingredients:
1 can (15 oz) pumpkin puree
1 can (12 oz) evaporated milk
3 large eggs
1 1/2 cups sugar
1 teaspoon cinnamon
1/2 teaspoon salt
1 box yellow cake mix
1 1/2 cups chopped pecans (the original recipe called for 1/2 cup, but I think it needed more)
1 cup butter, melted

Heat oven to 350 degrees F. Grease bottom of 9 x 13″ pan.

Mix pumpkin, milk, eggs, sugar, cinnamon, and salt. Pour mixture into greased pan. Sprinkle dry cake mix over pumpkin mixture and top with pecans. 

Drizzle melted butter over pecans. 

Bake 50-55 minutes.

When cool cut into squares. Serve with whipped topping or vanilla ice cream.
Pumpkin Crunch Cake


Wednesday, November 13, 2019

Libby's New Fashioned Pumpkin Pie Recipe

Libby's New Fashioned Pumpkin Pie
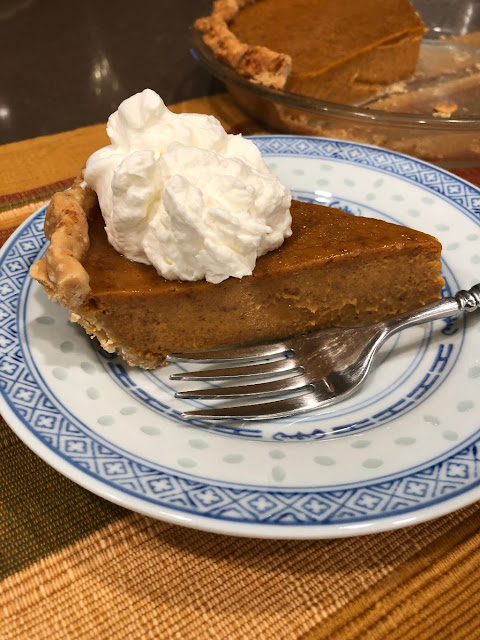
Libby's New Fashioned Pumpkin Pie bakes up beautifully!
“If it ain’t broke, don’t fix it!”  The Libby Pumpkin folks must have followed that mantra—the pumpkin pie recipe on their cans of pumpkin have not changed in over seventy years. Until this year. This year debuts a new pumpkin pie recipe to accompany the old one on the can label. I took the challenge and tried it out and I and my guests gave it eight thumbs up! The new recipe has a little more ginger, no granulated sugar, but sweetened evaporated milk instead, and comes out a little bit creamier. I found the cooking time to be a bit longer as well and be sure to put a foil cover on the crust to prevent over-browning. This will now be my go to pumpkin pie recipe!  

LIBBY'S NEW FASHIONED PUMPKIN PIE

INGREDIENTS

15 ounces (1 can) LIBBY'S® 100% Pure Pumpkin
1 cup NESTLÉ® CARNATION® Evaporated Milk
1 3/4 cups (1 can) or 14 oz. NESTLÉ® CARNATION® Sweetened Condensed Milk
1/2 teaspoon salt
1 teaspoon ground cinnamon
1/2 teaspoon ground ginger
1/2 teaspoon ground cloves
2 large eggs
1 unbaked 9-inch deep-dish pie shell*

INSTRUCTIONS

MIX dry ingredients in small bowl. Beat eggs in large bowl. Stir in pumpkin and dry ingredient mixture. Gradually stir in milk(s).

POUR into pie shell.

BAKE in preheated 425°F oven for 15 minutes. Reduce temperature to 350°F; bake for 30-40 minutes or until knife inserted near center comes out clean.

COOL on wire rack for 2 hours. Serve immediately or refrigerate.

Libby's New Fashioned Pumpkin Pie
This pumpkin pie slices up beautifully.
RECIPE SOURCE: Nestle Very Best Baking Website https://www.verybestbaking.com/recipes/147629/new-fashioned-pumpkin-pie/?recipeSortBy=Relevancy&keywords=new+pumpkin+pie#

*I'm really not keen on refrigerated pie dough although I do use Pillsbury when I do, but I've learned a trick to make the pie dough taste better. When you have let it come to room temperature, take 2 Pepperidge Farm Shortbread cookies and pulverize them in a food processor to fine crumbs. Unroll your pie dough and sprinkle dough with about a tablespoon of crumbs. Use your hand to smooth out the crumbs evenly. Take a rolling pin and lightly roll the dough pressing the crumbs into the dough. Flip the crust over and repeat. Spray your pie pan with butter-flavored spray or coat it with a couple of teaspoons of real butter. Place your dough inside and pinch out the border. Refrigerate until ready to use. This makes for a much better tasting crust!

Saturday, March 23, 2019

Easter Traditions--old, and new.

Pysanky
A few of my own personal Polish and Ukrainian Easter Eggs.
I miss the traditions associated with the Polish Easters from my childhood in Michigan—everyone wearing the ashes of Ash Wednesday, the fasting of Lent, the washing of feet on Maundy Thursday, the Stations of the Cross at noon on Good Friday, the blessing of the Easter Basket on Holy Saturday, and, of course, the beauty and solemnity of Easter Sunday with masses of fragrant Easter lilies surrounding the altar, brilliant white candles ablaze, and the smell of incense in the air. Even Easter lilies don't smell like they used to--they are very pretty, but not very fragrant.

I love Polish and other Slavic Easter eggs decorated in vibrant colors. The Polish word for decorated eggs is pisanki. I once tried creating them myself, but a tragic accident involving a broken bookshelf destroyed every one of my eggs. Since then, I began to collect eggs rather than create them. Some of my collection is visible here on my page. I found an outstanding website, Pisanki – the decorated Easter eggs in Poland,  that goes into much detail on the history of Polish Easter Eggs. There are also examples of eggs from different regions of Poland.

Ukrainian Pysanky
New Pysanky from the Ukraine, 2019.
At my grandmother’s home in Detroit, our Lenten fast was broken with a traditional Polish Easter soup (Biały Barszcz)—bowls filled to the brim with smoked meats, eggs, cheese, and rye bread, ladled over the top with a tangy white broth made from the cooking of the Easter kielbasa.

If you are looking for a recipe for our traditional Polish Easter soup, you can find it on my website here.

I found an idea for serving Polish Easter soup in rye bread "bowls". I thought it was a very creative idea. Click here to go to the website.

Dessert was usually a white cake covered in coconut in the shape of a Pascal lamb often made by my Aunt Hattie.

I often make a Easter Egg Nest Cake---it's a yellow cake accented with orange zest, and frosted with Sander's Buttercream Icing. 

A few weeks ago, I made a different cake that I thought would be a great cake for Easter because of its colors of purple-blue and vibrant yellow. The flavors of lemon and blueberry also make for a nice finale for an Easter Brunch.  

I found the recipe at Delish.com and made no changes to the recipe. It was delicious!

Lemon Blueberry Cake

INGREDIENTS
Lemon Blueberry Cake

1 18-oz. box vanilla cake, plus ingredients called for on box

Juice and zest of 1 1/2 lemons, divided, plus more zest for garnish

1 3/4 c. fresh blueberries, divided

3 tbsp. all-purpose flour

1 c. (2 sticks) butter, softened

3 c. powdered sugar

1/4 c. heavy cream

1 tsp. pure vanilla extract

pinch of kosher salt

2 thin lemon slices, for topping

DIRECTIONS

Preheat oven to 350º and grease three 9" cake pans with cooking spray. Line with parchment. Prepare cake mix according to package directions, then stir in juice and zest of 1 lemon.

In a small bowl, toss 1 cup blueberries and flour until completely coated (to keep the berries from sinking). Gently fold blueberries into the batter.

Divide cake batter evenly among prepared cake pans and bake until a toothpick comes out clean, 18 to 20 minutes.

Let cool in pans for 10 minutes, then invert onto a wire rack and let cool completely.

Lemon Blueberry Cake
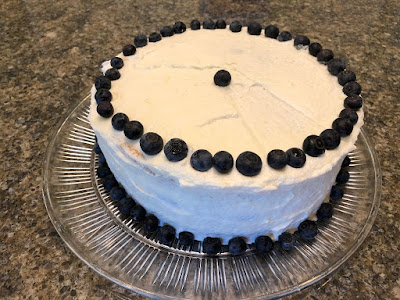
Showing the beautiful layers of lemon buttercream and blueberries.
Make frosting: In a large bowl using a hand mixer or the bowl of a stand mixer using the whisk attachment, beat butter and 2 1/2 cups powdered sugar. Add remaining lemon juice and zest and heavy cream and beat until combined, then beat in vanilla and salt. (Add remaining 1/2 cup powdered sugar as desired for texture and flavor.)

Place a dab of frosting on cake plate (to keep cake in place) and place parchment strips on each side of the cake plate. Place down first cake and top with frosting, then top with second cake and frost.

Repeat with third cake and frost sides.

Garnish with remaining blueberries, lemon slices, and zest and serve.

I found the recipe here: Delish


Thursday, March 14, 2019

Adam's Chicken Riggies

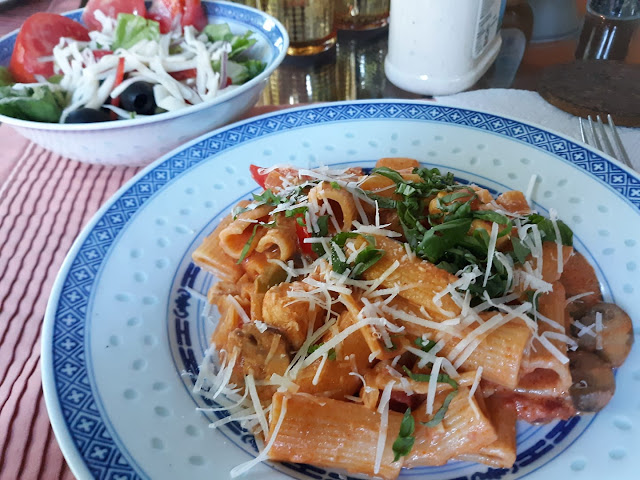
Adam's Chicken Riggies

I really enjoy finding and preparing U.S. regional dishes--Key Lime Pie from Florida, Shrimp and Grits from Charleston, City Chicken from Polish neighborhoods in the midwest, Cheesesteak Sandwiches from Philadelphia, etc.

I found this particular recipe on the Internet and it intrigued me as it appears to be a regional dish specifically associated with the Utica/Rome area of New York State. It is a spicy pasta with chicken and red and green peppers in a creamy tomato sauce dish.

I found most of the recipes for this dish to be much too spicy for me (and there are endless variations on the Net) so I played around with the recipe until I made one that suited my palate.  My contribution was using premade arrabiata sauce. You can easily make this dish spicier by adding additional arrabiata sauce, or dried red pepper flakes. I like it just as it is in this recipe. This recipe will easily feed five to six people.

Ingredients

MARINADE

1/2 cup dry sherry (I used 1/2 cup white grape juice and 1 teaspoon wine vinegar)
4 tablespoons olive oil, divided
3 garlic cloves, minced
1 teaspoon dried oregano
1 1/2 pounds boneless skinless chicken breasts, cubed

SAUCE:

2 tablespoons butter
1/2 medium sweet red and green pepper, chopped
1 medium onion, chopped
2 garlic cloves, minced
1 15 ounce can Italian diced tomatoes
1 1/2 cups arrabiata sauce
1/4 teaspoon salt
1/8 teaspoon pepper
1 box (16 ounces each) uncooked rigatoni
1-1/2 cups heavy whipping cream
4 ounces cream cheese, cut up
1/4 cup chopped fresh basil
1-1/2 cups grated Romano cheese

Directions

1. In a large resealable plastic bag, combine sherry, 2 tablespoons oil, garlic and oregano. Add chicken; seal bag and turn to coat. Refrigerate 1 hour.

2. Drain chicken, discarding marinade. Heat 2 tables olive oil in a Dutch oven over medium-high heat. Add chicken in batches; cook and stir until no longer pink. Remove from pan.

3. In same pan, heat butter over medium-high heat. Add peppers, onion and garlic; cook and stir until tender. Stir in diced tomatoes, arrabiata sauce, salt and pepper; bring to a boil. Reduce heat; simmer 8-10 minutes or until slightly thickened, stirring occasionally. Add chicken; heat through.

4. Meanwhile, in a stockpot, cook rigatoni according to package directions. In a small saucepan, combine cream and cream cheese over medium heat; cook and stir until blended. Add to chicken mixture; stir in Romano cheese.

5. Drain rigatoni; return to stockpot. Add sauce to pasta; toss to combine.

6. Plate pasta and sprinkle with fresh chopped basil.

Variations of this recipe on the Internet call for a much spicier version—too spicy for me. If you want to easily control the spiciness of the recipe you can add additional arrabiata sauce to taste.

If you try this recipe, I would love for you to post a comment and let me know what you think!

Wednesday, January 23, 2019

Hungarian Chicken Paprikash

I'm sorry I didn't take any pictures, but this recipe for Hungarian Chicken Paprikash turned out so well, that I decided I had to share it. I looked at several different recipes for Chicken Paprikash, and there are many out there, but this one is easy and mighty tasty. I used crushed tomatoes from Italy for the first time, thinking they were like petite diced tomatoes. They are not. They are more like a thick tomato sauce, but that works for this recipe. I would love to hear back from you if you try this recipe. The recipe will serve 4-6 people.

Adam’s Hungarian Chicken Paprikash

Ingredients

6 chicken thighs
3 tablespoons flour
2 teaspoons Montreal Steak Seasoning
2 teaspoons paprika
2 tablespoons olive oil
2 tablespoons butter, divided
6 skin-on, bone-in chicken thighs
1 medium Vidalia onion, quartered and sliced
1 medium sweet red pepper, sliced
2-3 tablespoons paprika (I used 2. Pretty mild. Next time I will use 3.)
1 15 oz. can crushed Italian tomatoes
1 1/2 cups lower sodium chicken broth
Salt and pepper to taste
3/4 to 1 cup sour cream
Serve with extra-wide egg noodles, spaetzle, or homemade dumplings.

Directions

In a gallon-size plastic bag, combine flour, steak seasoning, and 2 teaspoons paprika. Add chicken thighs and shake well to ensure chicken has been floured. Set aside chicken. Discard leftover seasoning.

In a large frying pan, heat 2 tablespoons olive oil and 1 tablespoon butter. When butter starts to sizzle, add chicken thighs, skin-side down. Brown on both sides, about 10 minutes. Set chicken aside and pour out all but about 1 tablespoon oil.

Add onion and red pepper to frying pan and saute for about 5 minutes. Add remaining tablespoon of butter if necessary. Stir in paprika and continue to sauté for another 5 minutes. Add can of tomatoes and the chicken broth. Stir and heat to a boil. Reduce heat and add chicken thighs. Cover and cook for about 35 minutes, turning chicken twice.

While chicken is cooking, prepare noodles, spaetzle or dumplings. After draining them add a bit of butter and chopped Italian parsley if desired.

Remove chicken from sauce.

In a small bowl combine sour cream with about 1/2 cup of the sauce. Then add sour cream mixture into frying pan. Stir until smooth. Add salt and pepper to taste.

On a serving plate or individual plates, add the starch and the chicken. Spoon sauce over the chicken and serve.

Tuesday, September 25, 2018

Banana Nut Bread with Nutella Swirls

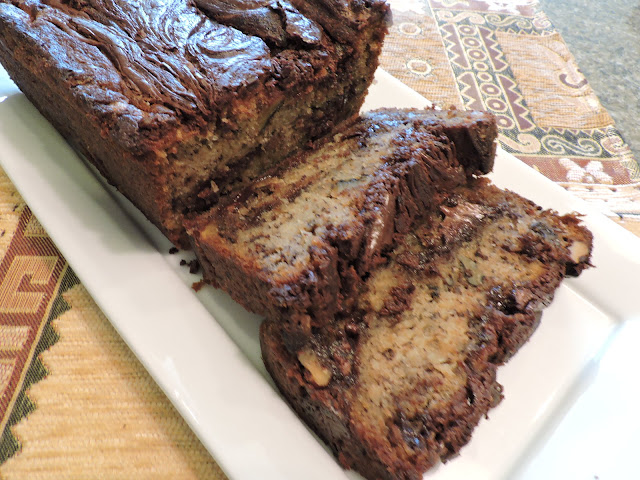
Banana Nut Bread with Nutella Swirls

I associate scents with memories. I once smelled recently cut grass while riding an elephant in Thailand and immediately I experienced intense thoughts of childhood on the farm in Willis, Michigan.

When I am baking coffeecakes and breads and I start to smell good things in the oven my thoughts go immediately to my grandmother’s house on Florida Street in Detroit and the niche beside the stairway to the attic, where all the baking bowls and pans were stored. Those mostly ceramic bowls from the size of a teacup to a small washtub intrigued me. I can still smell the raw wood of the attic, the mothballs kept in the linens and the faint aromas of cakes and breads, pies and cookies.

There is nothing better than the aroma of banana bread baking in the oven. Delicious as it is on its own, I have found a recipe that improves even the best banana bread—the addition of swirls of Nutella! Chocolate and hazelnuts and banana. I can almost smell that banana bread baking in the oven right now!

Nutella and bananas for Banana Nut Bread. Yum!
Banana Nut Bread with Nutella Swirls

Ingredients

2 cups all-purpose flour

1 teaspoon baking soda

1/2 teaspoon salt

1 cup (2 sticks) unsalted butter at room temperature

1 cup granulated sugar

2 large eggs

1 teaspoon vanilla

4 overripe bananas, mashed (about 1-1/2 cups)

2/3 cup coarsely chopped walnuts, toasted

1 cup Nutella

Instructions

Preheat oven to 350°F. Lightly grease and flour a 9×5-inch loaf pan and set aside.

Sift together flour, baking soda, and salt.

Using an electric mixer beat the sugar and butter until fluffy. Add the eggs, then the vanilla. Beat until well combined. Stir in the flour, baking soda, and salt. Fold in the mashed bananas until just combined. Stir in walnuts.

Spread one third of the batter evenly into the bottom of the prepared pan. Spoon one third of a cup of Nutella over the batter in the pan and then swirl through the batter with a table knife. Place one third of the remaining batter evenly over the first layer and swirl with one third of a cup of the remaining Nutella. Spread the remaining batter evenly over the top and top with the remaining one third of a cup of Nutella. Swirl through the batter with a table knife.

Place loaf pan on a baking sheet and bake for 60-70 minutes or until golden brown and a toothpick inserted in the center comes out clean. Let the bread cool in the pan for at least 30 minutes before removing to a wire rack to cool completely.

Do not slice banana bread until completely cool---at least 3 to 4 hours or overnight (You probably won’t be able to wait that long!)

Saturday, June 30, 2018

Razzleberry Pie Recipe

Razzleberry Pie
Homemade Razzleberry Pie with raspberries, blackberries and blueberries.
There is no such thing as a razzleberry, but a well-made Razzleberry Pie is scrumptious! Growing up in Michigan we had easy access to tangy raspberries that grew on the farm. Plump and juicy blackberries that stained your fingers purple when you picked them in the woods were hard to get, but, if the season was good, were worth the scratched-up arms and legs to get a pail full. Blueberries were harder to find, usually only available in the wilds of northern Michigan, but our neighbor planted some bushes in his garden—they weren’t as sweet as the wild berries, but we made do! All three berries ended up in pies or tarts of some variation, but I don’t remember mixing them when we were kids.

I don’t know how it came up, but a recent visitor from Ohio mentioned that her family loved the frozen Marie Callender “Razzleberry” Pie. The pie included raspberries, blackberries, and blueberries. Berries were on sale in the supermarket so I decided that I would make my own version and include a new thickening agent, Carnaby’s Ultra Gel, which I had never used before. Supposedly this gluten free corn-based product will “instantly thicken sauces, gravies, desserts and more!” while providing a clear, non-starchy, consistency that will not leave a starchy aftertaste. I will vouch for it! My Razzleberry Pie turned out great. The consistency of the berry filling wasn’t watery or gummy, but smooth and thick and the flavor of the berries really stood out.

Razzleberry Pie
A Razzleberry Pie fresh out of the oven.
RAZZLEBERRY LATTICE PIE

INGREDIENTS:
1 double crust pie crust (I used Pillsbury Refrigerated crusts)
2 pints raspberries
2 pints blackberries
1 pint blueberries
3/4 to 1 cup sugar
1/3 cup Cornaby’s Ultra Gel (bought on Amazon)
1/3 cup water
1 egg
1 teaspoon milk
1 tablespoon sugar
Butter-flavor spray

DIRECTIONS:

Roll out one pie crust a 9” pie plate, sprayed lightly with butter-flavor spray. Refrigerate until ready to use.
Prepping the berries for pie.
Preheat the oven to 400 degrees. Place a cookie sheet lined with tinfoil on the bottom oven rack.

Combine berries with 1/3 cup water. Stir together sugar and ultra gel, then mix thoroughly with berries.  Spoon berry mixture into bottom pie crust.

Cut remaining pie crust into one-inch lattice strips.

Place strips across the pie and then lift one end of every other strip and lay a new strip across the other way. Repeat with the other strips that were not originally lifted. Continue until you’re halfway across the pie then turn the pie around and repeat from the other side to make a lattice across the entire pie.

Whisk together the egg and water and then brush the top of the pie and immediately sprinkle with sugar.
Prepping the lattice crust for the berry pie. I was in a hurry and did a sloppy job.
Place pie in oven and immediately reduce heat to 375 degrees. Bake the pie for 25 minutes. Checking halfway through to see if the pie is browning properly. If necessary, place a piece of tinfoil around the edge of the pie and continue to bake for another 20-30 minutes, or until the filling is bubbly and the crust is golden brown.

Remove from the oven and cool completely. Serve with vanilla ice cream.

Note: Here's a pic of the package of Cornaby's Ultra Gel (They've changed the name to E-Z Gel but it's the same thing, which I used to thicken the pie. It worked great and I can't wait to try it in my apple pie recipe!


Wednesday, May 2, 2018

Even Better Than McDonald's Oatmeal Raisin Cookies

Even Better Than McDonald's Oatmeal Raisin Cookies
Even Better Than McDonald's Oatmeal Raisin Cookies straight from the oven!
I've been working on this recipe for weeks now, scouring the internet for copycat  recipes of my favorite cookie--McDonald's Oatmeal Raisin Cookies. Each time I made them they were mighty tasty but very flat--they didn't look like McDonald's cookie at all and the crunch wasn't there. Finally, I found an ingredients list for the oatmeal raisin cookie and added coconut and cornflakes to the mix. I did keep the Toffee Bits that were listed on the copycat recipe, but not on the ingredients list. I think it gives the cookies another layer of flavor--that's why I am calling this recipe the "Even Better Than McDonald's Oatmeal Raisin Cookies". I made some other tweaks to the recipe to get the color and texture right and have come up with what I think is a darned good oatmeal raisin cookie recipe. I would love to hear what you think, when you make them!

"Even Better Than McDonald's Oatmeal Raisin Cookies

Ingredients

1/2 cup butter, softened

1/2 cup margarine, softened

1 cup brown sugar

1/2 cup white sugar

2 eggs

1 tablespoon vanilla extract

1 3/4 cup all-purpose flour

2 teaspoons baking powder

1/2 teaspoon ground cinnamon

1/2 teaspoon salt

2 cups rolled oats, quick-cooking (not instant)

1 cup raisins

1/2 cup coconut, chopped

1 cup cornflakes, crushed (measure cornflakes, then crush them)

1/2 cup toffee bits

Directions

Preheat oven to 350 degrees.

In a large bowl or mixer, cream together the butter and sugars. Add eggs one at a time and beat, then add vanilla.

Combine flour, baking powder, cinnamon and salt. Gradually add into wet mix.

Stir together oatmeal, raisins, coconut, cornflakes and toffee bits. Stir into wet mix.

Refrigerate for at least two hours or overnight.

Roll into 1 inch balls and place on parchment-lined sheet pan. Gently tamp down the cookie before baking.

Bake for 10 to 12 minutes (oven time will vary based on size).

Let cookies cool on baking sheet for 5 minutes. Transfer to cooling rack.

These oatmeal raisin cookies spread better
when they bake if you gently tamp down the raw cookie dough
before baking.


Saturday, March 10, 2018

My Second Mother

In 1963 we moved from the farm to the “suburbs” where my father built a home in a new development called “Belle Harbor” just north of the town of Belleville, Michigan. Our new neighbors, Ernie and Pat Ryback and their three sons, moved there from the outskirts of Detroit.

Pat Ryback: My Second Mother
I consider Pat Ryback my second mother, and she considers me her fourth son. A whirlwind of activity always surrounded Pat. After her three sons were out of middle school, she returned to university and received a degree in library science. Pat was always working on something: creating learning activities for school, hosting dinner parties, shepherding foreign exchange students, providing advice to anyone within earshot whether they wanted advice or not.

The Ryback boys were my friends. From an isolated childhood on the farm, I now had three boys as friends. The Rybacks had a pool. It was great fun, although I was deathly afraid as I could not swim. I never really learned. We had great times: putting on shows for neighborhood kids, playing endless board games in the summer, chasing each other in the pool.

The summer of 1972 was a wild one for me.  I graduated from Eastern Michigan University in May. I worked for a congressman during the day and as an auditor at a Howard Johnson’s Motel at night. In between, I applied for teaching positions across the state of Michigan. I ran from one interview to another. I don’t remember sleeping.

In September, I realized I was lost. I no longer worked for the congressman. Howard Johnson’s changed management and I quit—the new management did not want to pay me for the hours I had worked. The opportunity of working as a graduate assistant was gone. No one wanted me as a teacher because I couldn’t coach football, basketball, or cross country. It was the Vietnam era when history and political majors like me were a dime a dozen.

On Saturday night of Thanksgiving weekend, I sat in Pat Ryback’s family room drinking German white wine and grilling Turkish shish kebabs in the fireplace, listening to an Italian opera on the stereo. These were portents of adventures to come (I would come to live in Germany, Turkey, and visit Italy several times). It was getting late, maybe 10 o’clock. Pat gave me grief for not following her advice and minoring in library science at university.

Pat asked me what I wanted to do with my life, and I told her I had no clue. She said, “I think you should go to library school!” She plugged in her phone and called the Dean of the University of Michigan Library School, waking him up. “I have an outstanding person for library school,” she said. “OK,” said the groggy Dean. “I’ll meet him on Tuesday. Have him bring his transcripts.” When Pat talked, people listened.

On Tuesday, I met with the Dean of the Library School at the University of Michigan. He looked over my transcripts. “The University of Michigan requires a foreign language for a Master’s Degree program. You don’t have it?” It was waived. “The University of Michigan graduate program requires a 3.5 academic level. You don’t have it?” It was waived. “The University of Michigan school library program, however, needs men. You’re in! If Pat Ryback recommends a student we accept them!”

In January of 1973, I entered library school at the Masters Degree level at the prestigious University of Michigan—a school my counselors at Belleville High School, just four years earlier, would never have considered a possibility for me.

Obtaining the degree in Library Science would end up defining my life, opening doors of opportunity across the world.

Thank you, Pat, my second mother. You saw something in me that others did not and it has made all the difference.

Happy Mother’s Day!

Dumplings and homemade noodles of all types were found in Polish American houses in the Detroit area. From big, fat, filled pierogi, to delicate egg noodles served in chicken soup.

Homemade Chicken Soup with Chicken Liver Dumplings (Wątrobiane kluski do rosołu)

I learned how to make these dumplings at Pat’s house when I was about 13 years old. They have been a favorite ever since! Don’t let the fact that they are made from liver deter you from trying these dumplings. The taste is very mild, but very rich.

Pat Ryback’s Chicken Liver Dumplings

1 cup chicken livers, finely chopped
1 cup flour
2 tablespoons Italian parsley finely chopped
1 tablespoon grated onion
1/2 teaspoon salt
1/2 teaspoon pepper

Combine ingredients and stir well.

Bring a large pan of water to a boil. Add 1 teaspoon salt.

Spoon teaspoonfuls of dumpling batter into boiling water. Do in batches. Do not crowd dumplings.

Stir occasionally until noodles come to the top, about 5 minutes.

Remove noodles to a colander and gently rinse with cold water.

These are delicious served with homemade chicken soup.


Thursday, January 11, 2018

Coconut Poke Cake with Marshmallow Snowmen


Coconut Poke Cake with Marshmallow Snowmen

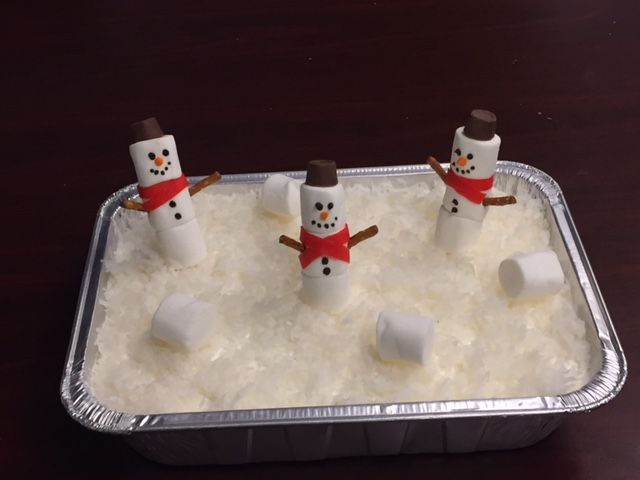
I served a Coconut Poke Cake at a Murder Mystery Dinner held at my church, St. John the Apostle, MCC, on March 17, 2017. To make it go with the St. Patrick's Day theme, I sprinkled tiny green candy shamrocks I found on Amazon.com. This is a great party cake, but note that it is a bit on the ooey, gooey, side. I made it again for my husband’s work Christmas Party this year, adding marshmallow snowmen on top. It was a big hit!

24 servings

1 (18.25 ounce) package white cake mix
1 (14 ounce) can cream of coconut  (NOT coconut milk)
1 (14 ounce) can sweetened condensed milk
1 (16 ounce) package frozen whipped topping, thawed
1 (8 ounce) package flaked coconut

Directions

Prepare and bake white cake mix according to package directions. Remove cake from oven. While still hot, using a utility fork, poke holes all over the top of the cake.

Mix cream of coconut and sweetened condensed milk together. Pour over the top of the still hot cake.

Let cake cool completely then frost with the whipped topping and top with the flaked coconut. 

Refrigerate at least 4 hours before serving.

Notes: I have also make this recipe using real whipped cream rather than whipped topping—either way it is terrific!

Marshmallow Snowmen
Marshmallow Snowmen
Marshmallow Snowmen in transport!

The directions are for three snowmen.

9 large marshmallows
3 pretzel sticks broken in half
3 Rolo chocolate covered caramels
3 pieces of red fruit rolloups
Black decorator icing
Orange decorator Icing
3 8-inch bamboo skewers

Thread 3 marshmallows on to bamboo skewer with pointed side up leaving room for the Rolo. Push the Rolo caramel, wide side down, on top of the skewer to make the hat.

Use a skewer to create a 1/2 inch deep hole on either side of the middle marshmallow. Insert 1 piece of pretzel stick on each side to create arms.

Trim fruit rollup to 1/4 inch wide by about 4 inch pieces to form scarf on top of the middle marshmallow.

Use black icing with pointed tip decorating tube to form eyes, mouth and buttons on the snowman. 

Use orange icing with pointed tip to create the “carrot” nose. Refrigerate for a couple of hours to allow icing to set.

Insert snowmen, skewer side down into top of cake.

Note: You could vary the colors by using gum drops for a hat with different color fruit rolloups.